

Nick, after reading the above link I went ahead and ordered the unit. It was a simple procedure to conver the unit from a de-humidifier controller to a humidifier controller. I have been testing it and it works well. The only drawback is that I thought it had an external humidity sensor but it's insde the box. The sensor in the picture is for temperature. So I will need to mount it inside the chamber. A small fan will also be necessary to move the air around inside for better humidity and temp accuracy.atcNick wrote:Just found this post on another site that might be helpful. It's a modification for that unit.
http://forum.grasscity.com/do-yourself/ ... m-1-a.html
How To Build A Home Made Curing Chamber... By Uwanna


Anyone have any suggestion how best to drill through the wall of an upright frost free GE freezer? I can't find any schematics for it with details of what's in the wall.. Thanks.
Also, do you guys just use a standard drill bit?
Also, do you guys just use a standard drill bit?
-Nick
Custom R&O Smoker
Cedar Smokehouse
Weber Performer
Weber 22.5" One Touch Gold Kettle
Weber 18" WSM
Weber Smokey Joe
Lang 84 Deluxe w/chargriller SOLD
Cinder Block Smokehouse RETIRED
Custom R&O Smoker
Cedar Smokehouse
Weber Performer
Weber 22.5" One Touch Gold Kettle
Weber 18" WSM
Weber Smokey Joe
Lang 84 Deluxe w/chargriller SOLD
Cinder Block Smokehouse RETIRED


Last time I made a "keg-o-rator" out of a refrigerator, I used a hole saw to drill the hole. You may not need that large a hole, however. Any bit designed for metal ought to work fine. (Don't use a spade bit. They're designed for wood.)atcNick wrote:Anyone have any suggestion how best to drill through the wall of an upright frost free GE freezer? I can't find any schematics for it with details of what's in the wall.. Thanks.
Also, do you guys just use a standard drill bit?
In a refrigerator, you'll encounter one layer of sheet metal, then foam insulation, then the plastic liner. In my refrigerator, all the refrigerant coils were mounted in the top (freezer compartment) so I didn't drill through anything vital. (I side-mounted the beer taps, rather than in the door.) However, your freezer may be different. You should inspect yours to see where the coils actually are. I was considering converting a small freezer which had coils on each shelf. That would have been bad! Instead, I chose a small chest-type freezer, and drilled a hole in the rear, fairly high, within an inch of where the top seal was. ...no problem. I ran the CO2 supply line and temperature sensor through there.
I then mounted the taps on the hinged top. ...caught hell for it, too. I glued Beloved Wife's favorite cooler to it, bolted it down, sawed through the bottom of the cooler and top of the freezer to run the hoses, and mounted the taps on the cooler.
Just make sure you know where the coils run. If not sure, you could drill just barely through the sheet metal, then gently poke around in the foam, to make sure you miss. One thought: a small exploratory hole, then a "nibble" tool to enlarge the hole, if you need a large hole.
Experience - the ability to instantly recognize a mistake when you make it again.
Got the hole made. I took out one of the plastic plugs inside the freezer thats used to hold the shelves. There was insulation behind it so I was able to just dig it out to see if there were any coils. No coils so I drilled.
Now Im trying to figure out how to seal the hole after I run the cable through it? Should I just use caulk or is there something else that I could use thats less permanent incase I want to change something up later on?
Now Im trying to figure out how to seal the hole after I run the cable through it? Should I just use caulk or is there something else that I could use thats less permanent incase I want to change something up later on?
-Nick
Custom R&O Smoker
Cedar Smokehouse
Weber Performer
Weber 22.5" One Touch Gold Kettle
Weber 18" WSM
Weber Smokey Joe
Lang 84 Deluxe w/chargriller SOLD
Cinder Block Smokehouse RETIRED
Custom R&O Smoker
Cedar Smokehouse
Weber Performer
Weber 22.5" One Touch Gold Kettle
Weber 18" WSM
Weber Smokey Joe
Lang 84 Deluxe w/chargriller SOLD
Cinder Block Smokehouse RETIRED

Well I have my curing chamber set up. And Im doing a test run, it's been about 12 hours now. I have temp set at 57F and humidity at 85%. It's right on the money!! But Im having a problem, There seems to be a lot of water on the bottom of the freezer. Its almost puddling. Take a look at the pictures. I wonder if this will cause more problems as time goes on or if I should figure out a way to keep it dry?
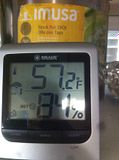
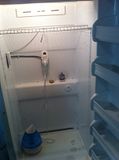
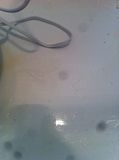
You can click the thumbnail photos to enlarge them. This is a GE upright frost free freezer.


You can click the thumbnail photos to enlarge them. This is a GE upright frost free freezer.
-Nick
Custom R&O Smoker
Cedar Smokehouse
Weber Performer
Weber 22.5" One Touch Gold Kettle
Weber 18" WSM
Weber Smokey Joe
Lang 84 Deluxe w/chargriller SOLD
Cinder Block Smokehouse RETIRED
Custom R&O Smoker
Cedar Smokehouse
Weber Performer
Weber 22.5" One Touch Gold Kettle
Weber 18" WSM
Weber Smokey Joe
Lang 84 Deluxe w/chargriller SOLD
Cinder Block Smokehouse RETIRED
Where to place the humidifier?
Question to Uwanna or anyone else with experience in a fridge retro. When using a cool mist humidifier is it better to place it on the bottom of the unit or on the top shelf. I am not sure whether the mist emanated from the humidifier travels up or down. I know that warm vapour is lighter than air, but at 55F? From a visual perspective it appears to me to drift in a downwards direction, but maybe then it travels up.
Guys,
Mist has droplets which are heavier than air, so it will flow downward. As the mist evaporates, it becomes gaseous, and gases mix completely if given enough time and/or mixing agitation. Put the humidifier high, and put a fan inside. If you find that the inside gets wet (beyond a small area), you're feeding it water too fast or mixing too slowly. If it doesn't get wet, you can move the humidifier to wherever is convenient, as long as there's plenty of circulation.
To be honest, put the humidifier anywhere you want it, inside, and as long as there's sufficient circulation and mixing, it'll work fine. Watch out for shelving, which acts like baffles. Overloading the thing with too much sausage will do the same thing.
True, different vapors have different densities, but the energy imparted by a fan or mixer and by Brownian motion tends to mix them. You have to increase gravity considerably (example- - uranium hexafluoride in an ultracentrifuge) to get any stratification, once gases are mixed. Even then, the concentration gradient is pretty small, so you have to put a large number of 'em in series and flow the tops and bottoms of the tube contents countercurrently, to get much separation. (...and now you know enough that the CIA`will come a-tap-tap-tapping at your door.)
That's more than you probably wanted to know. Sorry about that. Put the fan in and let 'er rip!
Experience - the ability to instantly recognize a mistake when you make it again.
Hey all
Redzed in response to your question, I have my humidifier setting at the bottom of the fridge/ curing cabinet. In regards to the water vapors being heavier than air, Ross is correct air is heavier than water vapors. Due to the small area inside the curing cabinet there is no problem with creating humidity by setting the humidifier at the bottom of the curing cabinet. On another note, in regards to a fan, I have one installed but I don`t use it. I have found even at vary slow speeds, my salami`s where drying out to fast with the installed fan. Keep in mind, the humidifier has a motor and fan that will circulate air flow periodically. I feel this is enough air circulation, and has been working fine for my application. Just a thought for the beginner, keep project notes record dates, temp and humidity levels, it will help on the next project. For the full fermented salamis, I take a photo of the project for every week that would pass just too compare
Wally
